Pet Planters
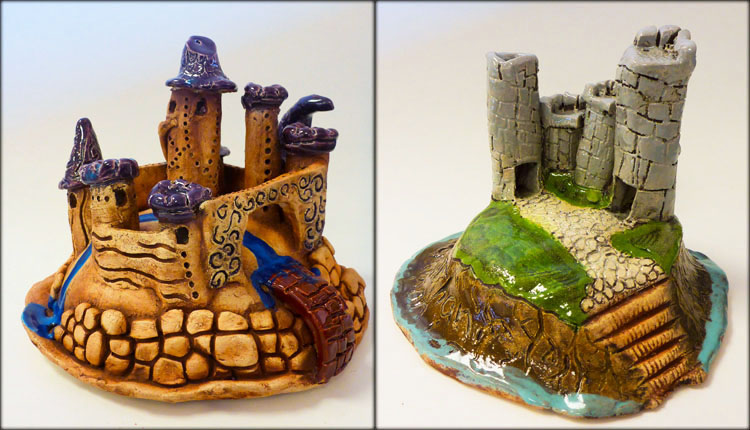
What could be more whimsical than a hand-crafted miniature castle? After studying medieval castle architecture, terminology and function, students came up with their own creative designs.
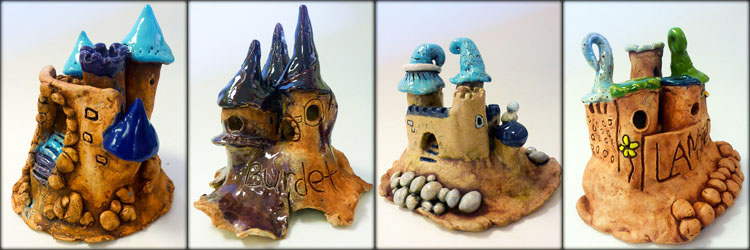
Beginning with clay slabs draped over newspaper armatures, each student created a “motte,” or earthwork mound on which to build their castle. Next they constructed a number of cylinders that would become tower structures with spires or crenelation at the top. Most of the castle pieces were built using slab construction to maintain hollow forms.
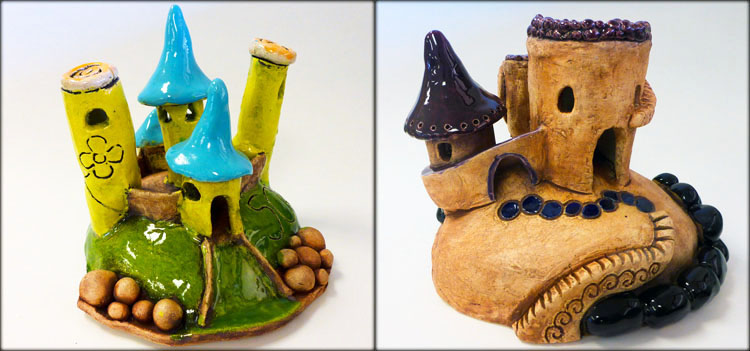
Once the towers were formed and attached, students carved out windows and doors and added stone or brick texture. Walls and walkways connect the towers and allow the viewer’s eye to wander through the sculpture, going in and out of doors, across bridges, and up winding staircases.
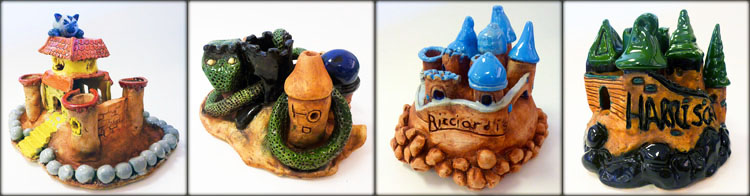
Although students started off with a general plan mapped out in their sketchbooks, the process took on an organic and spontaneous nature. Generally students worked from the center moving outward, adding details and improvising along the way. A final detail included each student’s family crest (or last name) carved into the wall of the castle.
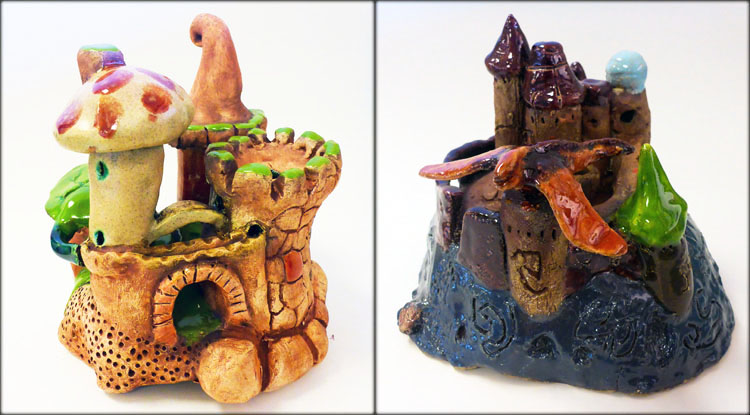
After bisque firing, the castles were finished with an iron oxide stain and the addition of selective glaze colors. The reddish-brown stain creates an earthy natural look and highlights texture by creating contrast. The limited color palette enhances unity and allows students to experience the magical glaze transformation that happens during firing.
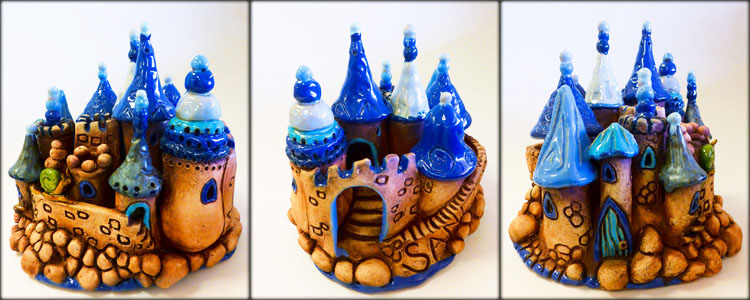
The three views of my example above shows a variety of sculptural detail that can only be witnessed by moving around the castle and looking from all sides. While the photos can show the general idea, these creative artworks are best viewed in person!
This tile project was made possible by a generous donation from local ceramic artist, Nanette Butler. After retiring from her tile business, Agape-Aloha Isle Tiles of Hawaii, Nanette decided to share everything from bisqued tiles, colorful glazes, kiln furniture and even shelving with our school.
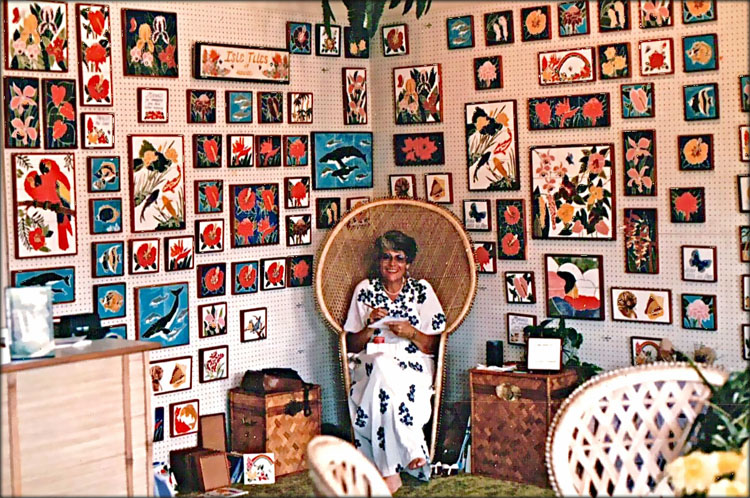
Pictured above is the artist in her shop, surrounded by all of her vibrant artwork. Mahalo nui loa, Nanette, for providing us with such high quality ceramic supplies and this amazing opportunity!
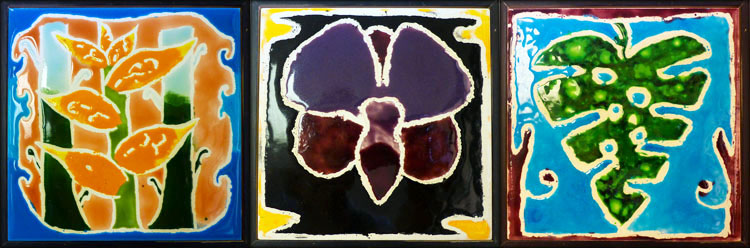
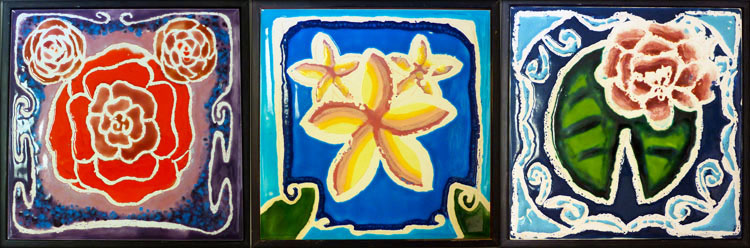
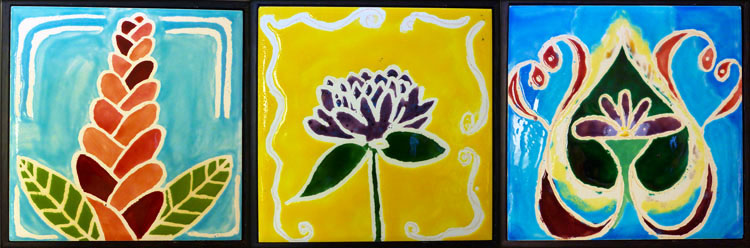
The floral and plant designs for this project were inspired by the Garden Isle’s tropical foliage along with Art Nouveau style from the late 19th and early 20th centuries.
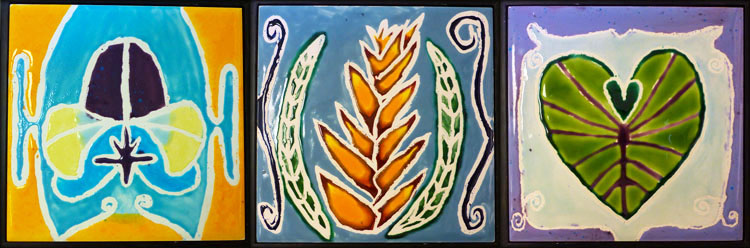
The history of ceramic tile is ancient, involving utilitarian uses along with regional and cultural decorative styles that span the globe. Art Nouveau tiles happen to be one of my personal favorite styles that also was easily adapted for our Hawaiian plant designs.
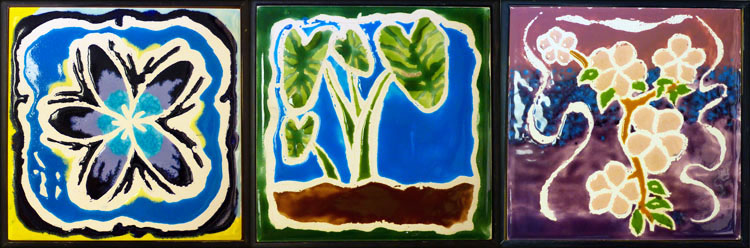
After several practice thumbnail drawings in their sketchbooks, students selected a flower or plant of their choice for a final design. Some popular designs included plumeria, hibiscus, haleconia, lotus, orchids, monstera and taro.

Students imitated Art Nouveau style by simplifying shapes, integrating curvy “whiplash” lines, adding a border or frame and making their designs symmetrical. Before applying glaze, a thin layer of wax resist was applied to all lines to create a white outline. Finally, a minimum of 4 glaze colors were applied to all unwaxed surfaces before the final glaze firing.
Each student brought home an original tile that can serve a variety of purposes. It can be used to protect furniture from a hot serving dish or glass, or it might be incorporated into a tile wall or backsplash as a feature design. Some may simply want to display it on a shelf for aesthetic enjoyment.
Thanks to Nannette, we still have some leftover tiles that I plan on using for a more collaborative project in the near future. Maybe a tile mural for our classroom is on the horizon!
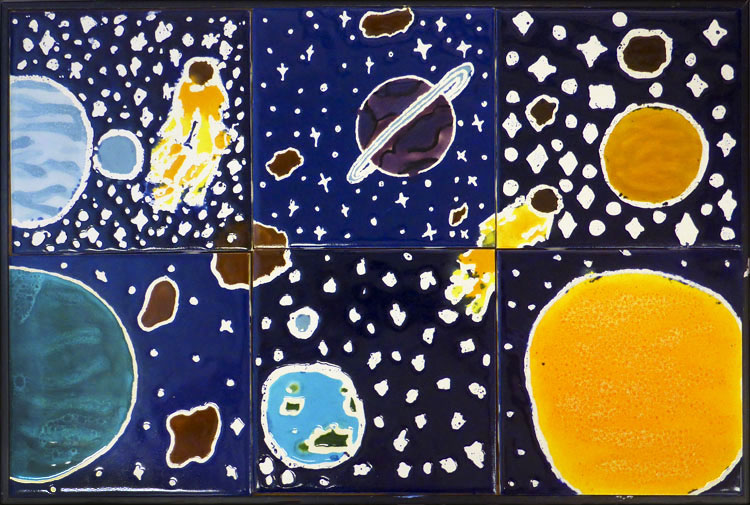
The collaborative design above was created by six ambitious eighth grade students who had some extra time in class. They worked out the overall “outer space” composition together, and then each glazed her own tile. This will be an inspirational example for next year’s project!

Kapa’a Middle School’s Art students finished their tiki sculptures with either a pure white or natural brown glaze.  By limiting to one glaze color, the emphasis of this 3-dimensional work remains  the carved textures, modeled form, and sculptural details.
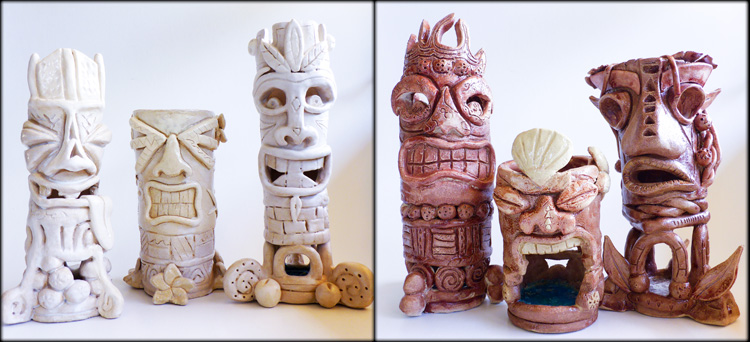
In addition to expressive tiki characteristics, some students chose to include added symbolism to represent a specific hawaiian tiki god or their own special meaning.

While mainly decorative, the tikis can also serve a variety of functions, from garden art, candle holders, incense burners, or creative containers to hold knick-knacks. Â Melted colorful class at the base adds a colorful surprise when you look inside!

The sculptures pictured here are only a few samples to represent a range of students from 6th, 7th, and 8th graders selected from all of my classes. Â In all there are 170 tikis that required a total of 500 lbs of clay, 5 gallons of liquid glaze, a number of kiln loads, and 4 months to complete!
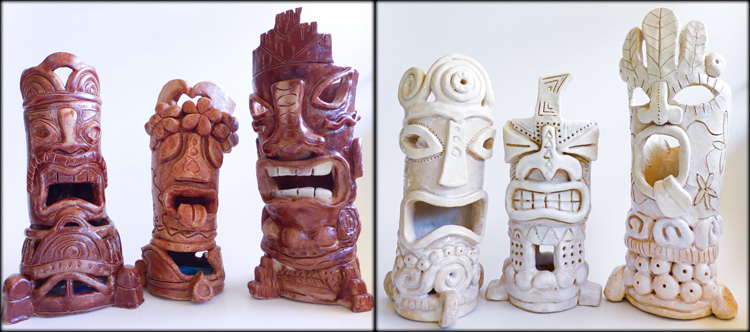

During second quarter Kapa’a Middle School Art students created a ceramic sculpture with a Hawaiian tiki theme. Along with clay hand-building techniques such as coil and slab building, students also explored the history and symbolism of tikis. These modern tikis represent students’ unique interpretation of an ancient cultural practice. While some students chose to include symbolism representing one of the four ancient tiki gods Lono, Kanaloa, Ku or Kane, others chose to invent their own tiki god.

This week I’m loading up the kilns to prepare for bisque firing. When students return from Winter Break they will finish by glazing their sculptures. Stay tuned for the final Artworks!
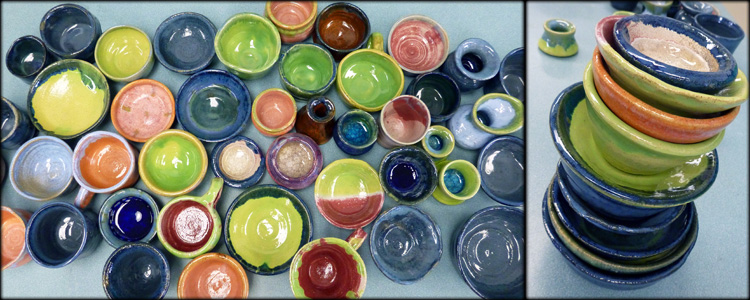
These images follow the original Pottery Wheel Demo I shared back in January. It was challenging to make sure nearly 170 students each had a turn to throw considering we only have 5 wheels! Somehow we made it happen before running out of time at the end of 4th quarter. Pictured are students’ very first pottery wheel projects… great job kids!
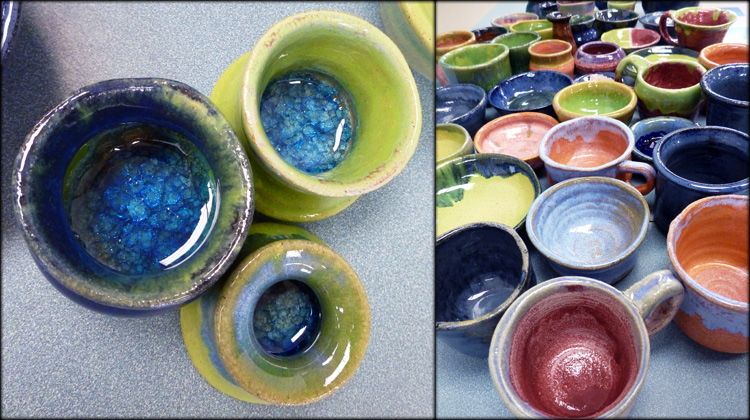
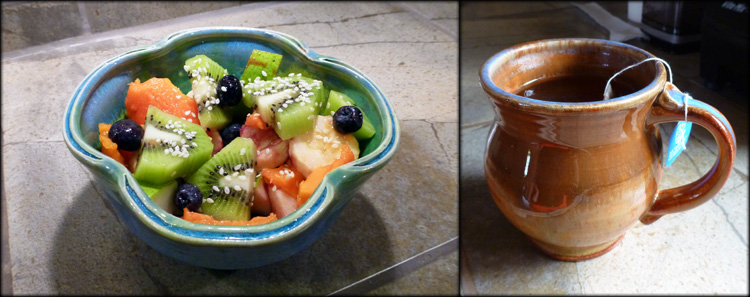
All cups and bowls were fired to cone 5 with non-toxic food-safe glazes. There’s nothing like enoying a tasty treat from your own handmade pottery!
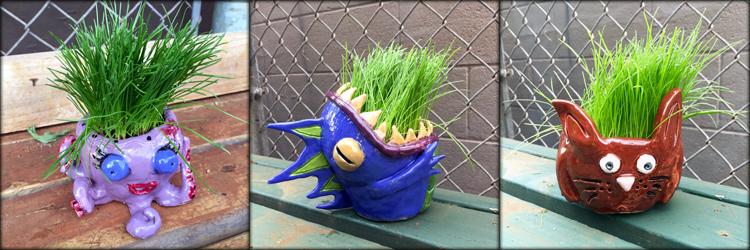
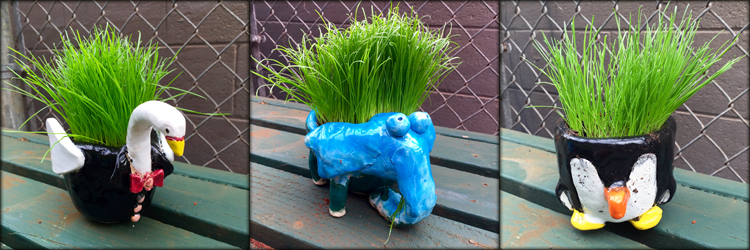
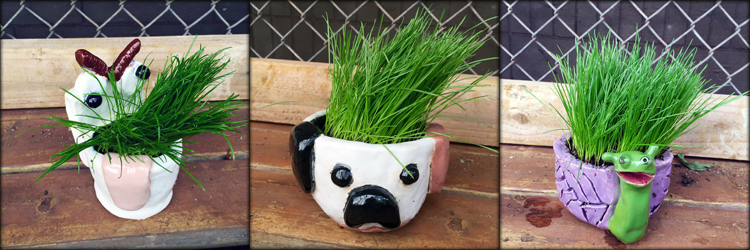
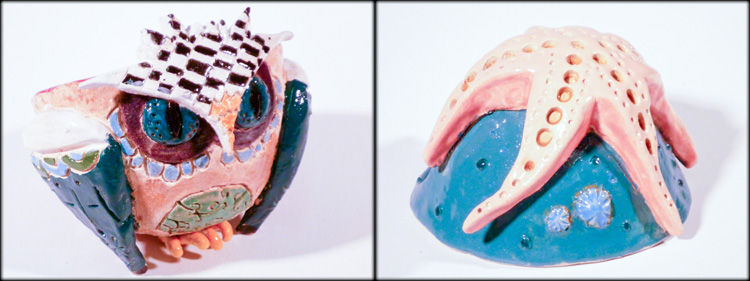
The first batch of Critters is out of the kiln! These little pinch pots have definitely got BIG personality! I also included the names and descriptions that students invented for their critters.
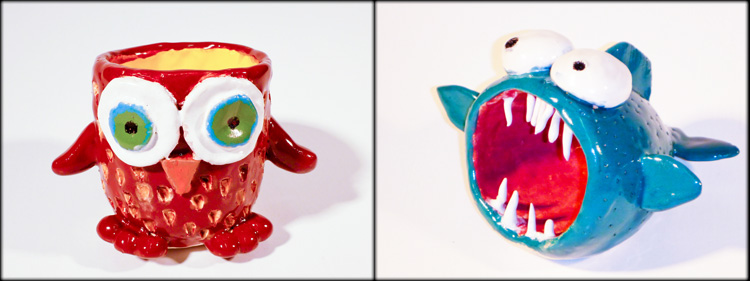
“Crackers,” the small brown owl, secretly lives in the cupboard and eats all types of snack food. He plays practical jokes at night and naps during the day. “Peri Piranha,” the ferocious fighting fish loves to eat sushi. He is camouflaged in the aqua-marine colored water so that he can sneak attack other fish.
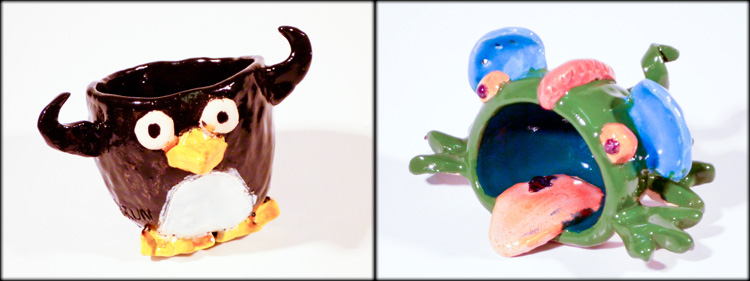
“Bob,” the party penguin lives in Los Vegas and loves to eat eat junk food including chips, pizza, Oreos, and cookies. He behaves like a penguin unless he is threatened, in which case he will shoot lasers out of his eyes.
“Shadow,” is a rare creature called an Eclipse Dixit. Dixits are known to travel the world looking for cocoa beans. Every lunar eclipse flocks of Dixits sing a beautiful song.
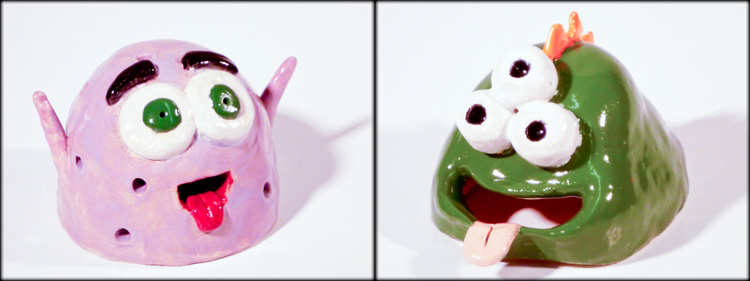
“Chubbs”, the spotted monster, lives in the pantry and likes to eat Cheerios. He is famous for his pro-tennis career and he likes to give out hugs.

“George”, the baby elephant, lives in the garden and eats blueberries. He likes cloud-watching, smelling flowers, and swimming with his gnome friends. “Ella,” the pink elephant will do tricks for peanuts- her favorite treat! She can spray water with her trunk, and juggle up to four things at once!
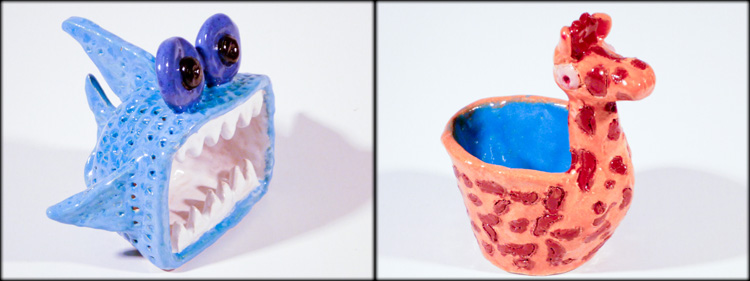
“Kitty,” the Luna Shark loves to eat java chip ice cream while watching his favorite shows- Gossip Girl and Vampire Diaries. “Roger,” the giraffe likes to eat apple bananas and watch Sponge Bob.
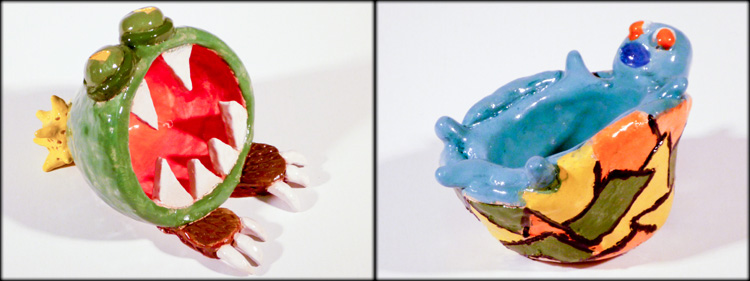
“Mud,” the green spike-tailed Croop, lives in swamps, marshes, and wet muddy areas. Croops will eat anything that fits in their large mouths and like to hunt prey by hiding in the mud. When threatened, Croops can dig in to the ground leaving only a spiked tail above ground acting as a primitive but effective form of protection.
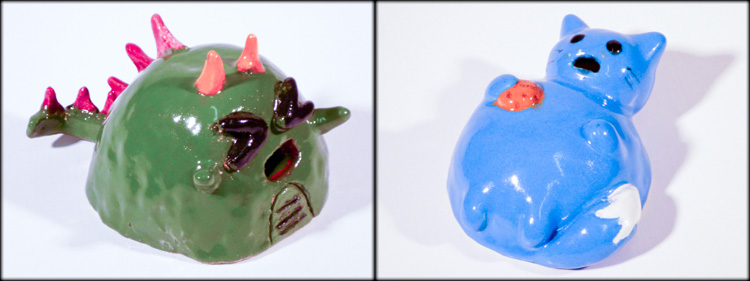
“Chompers,” the gaming dinosaur loves to eat tacos. He lives under the bed, sleeps all day, and plays PS3 all night. “Mr. Buttercup,” the spoiled fat cat, spends his days in bed at a royal palace. His favorite things to do are take naps and eat cookies.
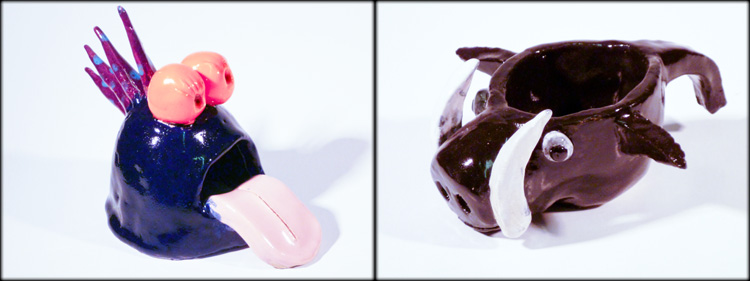
“Spike,” the spiky blob, lives in an underwater cave and eats noodles. You know he’s happy when he turns pink, and he puffs up when he gets mad. His favorite thing to do is ride on the backs of narwals. “Trig,” the pig-troll sleeps under a bridge and eats anything he can find. Although Trig looks scary, he is actually very kind. He will only attack with his razor-sharp tusks if he gets scared.

I had so much fun demonstrating different throwing techniques on the pottery wheel for Kapaa Middle School Art students! Wheel-throwing is not easy to learn, but it is certainly rewarding and FUN!

Pictured above are the various forms and vessels that were the result of my “demo day.” You can also see a peek into our studio space, which is equipped with 5 pottery wheels that students will rotate on to.

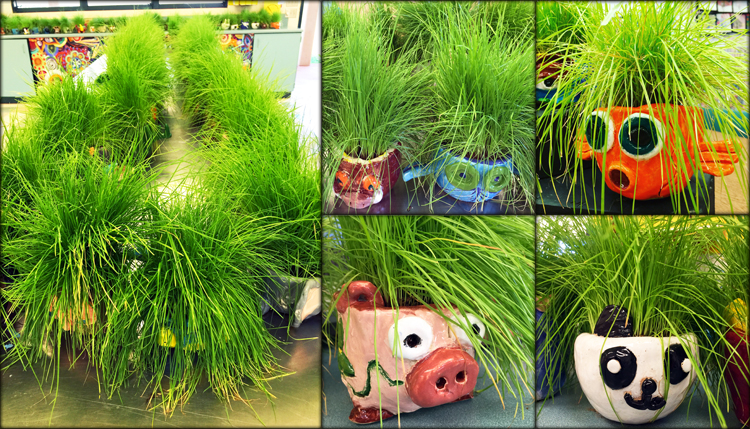
The first clay project this year was to hand-build a simple pinch pot and then transform it into a Creative Critter by adding features such as faces, wings, tales, feet and other details. They all turned out so unique!

Before leaving for the holiday break, we tucked these clay babies into the kiln where they will be bisque fired and prepared for glazing when the kids come back in the New Year.

Stay tuned for the finished projects! Next I will be introducing Kapaa Middle School Art students to the pottery wheel… get ready for a fun mess!

Kapaa Middle School students finished off the semester by turning in their ceramic masks. Now I just need to load the kiln, fire, and return 160 masks before we glaze them and fire again!

One observant student found a piece of plastic on the beach that distinctly resembles the African masks we studied in class. She brought it to share, and now it’s hanging on our classroom wall for inspiration. I haven’t even introduced them to readymade art… I think we have a Marcel Duchamp in the making!

I don’t believe in art. I believe in artists. -Marcel Duchamp

Pinch Pots are almost always one of the first projects in any Ceramics class because they help students learn some of the most fundamental skills needed for both hand-building and wheel-throwing. The artist begins with a wedged ball of clay, inserts a thumb by pressing into the center, and pinches the walls of the pot while rotating and smoothing. Sounds easy? Surprisingly this takes quite a bit of practice!
Once my students had successfully created a pinch pot, I asked them to add something to it in order to add interest. That “something” was up to them (as long as there was no trapped air to create an explosion), and it was wonderful watching the original pots transform under the influence of their imaginations!
