
This year Kapaa Middle School Art students experimented with a variety of surfaces and display options for their paintings. While some students worked on canvas and wood for their ACRYLIC LANDSCAPES, others opted to create a 2-way painting called an Agamograph.
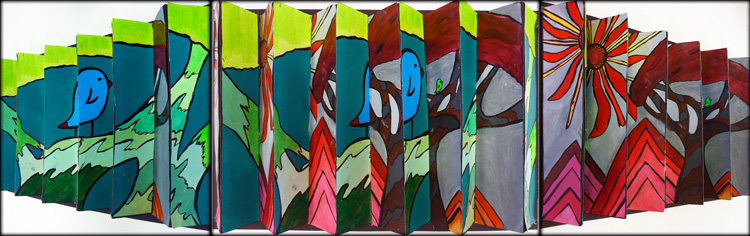
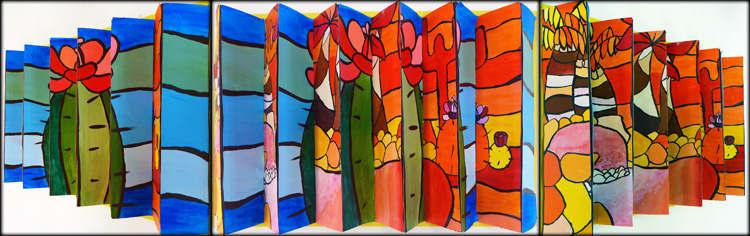
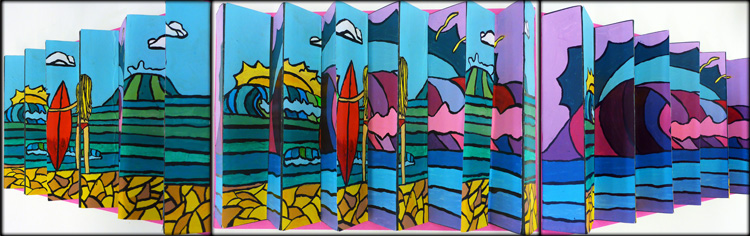
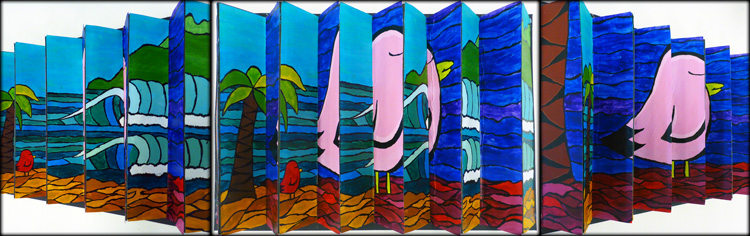
The examples pictured here show 3 views of the same project:
– The center view shows two separate images converging.
– From the angled views on either side, the viewer sees only one image.
The complete composition comes to life only as the viewer physically moves from one side to the other.

To accomplish this magical illusion, students first created two acrylic paintings on paper. The first painting was a stylized landscape using analogous colors, while the second included a close-up detail from the first landscape in a different analogous color scheme.
Once the paintings were complete, students measured, numbered, and carefully cut both paintings into 2″ strips. The strips were then glued to an accordion folded board. While our final Agamographs became two-way paintings, instructions for a 3-way version can be found on the Art-Rageous website.
Agamographs are named after Israeli artist, Yaacov Agam, who was a pioneer creator of the kinetic art movement. Students were intrigued by his large-scale sculptural work and abstract style. By following in Agam’s footsteps, students learned a new way to actively involve the viewer in their artwork.
For anyone who might want to replicate this project, it can be accomplished with a variety of 2-dimensional media, including photography, ink drawings, colored pencil, or oil pastel to name a few. I recommend selecting a subject for each image that relates in some way or creates a duality. Visual contrast between the two images also enhances the transformative effect. Feedback is always welcome! Comment with any questions and let me know what you think!
These are fantastic! Would you mind sharing exactly what kind of paper you had the students use for the paintings, and what board you used to glue the paintings on? Thank you for sharing!
Thanks Lauren,
Students used a basic student-grade drawing paper to paint on, and black railroad board for the accordion back. We used regular white Elmer’s Glue to attach the painting (strips) to the accordion fold. However, it remains flexible if the whole thing isn’t glued down to a third piece of railroad board. A hot glue gun works best when attaching the folded corners to a flat base.
Hope that helps!
Julia
Hi Julie,
Love this project! How long did it take your students to complete? Also, what size were the original paintings and how wide are the cut strips? Love your entire website too!
Thanks!
Thanks Monica,
I’m pretty sure the original paintings were 10″X12″. And if I’m remembering correctly, the cut strips were 2″. Sorry! It’s been awhile since I did this project, but the measurements can be adjusted to accommodate your available time and materials. We spent about 5 weeks on this project.
Wow! I would love to do this project. I remember when I was in 6th grade and I saw my friend working on this. It looks really cool and fun.
This project looks really fun and interesting and I would really enjoy doing this project! This is really creative and artistic because you can see different pictures when you look at it from different views and angles. This year I would like to learn how to draw waves and watercolor the ocean.
I like how when you flip the project it looks totally different. I think that we should do that project this year.
I like how you can see 2 different pictures when you look from a different angle. I hope that we can do this project this year.
I love the way that two paintings are incorporated into one with these. The bright colors of the acrylic are really eye catching, and I love the optical illusion that is created. It reminds me of impressionism (even though that style is completely different) because of how you need to step back and look a certain way in order for the image to make sense.
This year I would like to work on figure drawing, and portraits. I would love to continue learning about how to draw the human face. I’m excited for my second year of art with you!
Thanks!
Maddie Hoesel
Wow this project looks so cool and probably fun to do. I really like this project because sometimes I have so many ideas and cannot decide which one to choose so this project lets me choose two different pictures. Also, this project is actually kind of confusing when you first look at it, which I like because it makes me really think about the picture. In this coming year I hope to learn a lot, however I was in your class last year and I really liked improving my portrait skills and this year I would like to make them even better.
Thank you,
Ashley Ricciardi
I think that this is a really cool project because it its like a two-in-one and you have to move around to see the whole picture. I also like it because it is a 3-D drawing.
I think this is a really cool project and would like to learn about it this year. To me this is a great project because there is so many different things you can do with it.
Your project inspired me to do this with my fifth graders! I know, maybe a bit too overzealous for kiddos that I only see once a week for 45 minutes! Granted, I probably won’t ever do it again! However, even though I’ve been knocking myself out, making sure everyone had the backgrounds done correctly, with added extensions, as I didn’t realize they needed to be much larger, we are getting it done! Here are my beginning examples: https://www.artsonia.com/museum/gallery.asp?project=1864586&fbclid=IwAR0iSmZREJFWV1jYxstVh_FdAF_6t7SC-Ni2n_zKStSzopLGWLDhgWHiv6w