Treehouse in 2-Point Perspective

treehouse_01

The final project for Kapaa Middle School Art students this year was to fold and decorate a large portfolio to carry a year’s worth of Artwork home safely. With only a few school days left, I decided to squeeze one more foundational drawing lesson in and teach the kids 2-point perspective.

treehouse_02

Students used rulers and pencils to map out two vanishing points set on a horizon line. Together we drew a small group of cubes to which we added roofs, doors, shingles, and other features.

treehouse_04

After sketching about 3 different house structures, we incorporated the tree and branches that support the treehouse. At this point students broke free from my step-by-step tutorials and added their own creative and unique details such as rope ladders, lanais, zip lines, hot tubs, and slides.

treehouse_03

Due to the rushed nature of this last assignment, I don’t have many finished examples to share. Several students promised to finish what they started over the summer break. I hope they follow through on that promise because these tree houses are Treemendous!

Acrylic Agamographs

agamograph_01

This year Kapaa Middle School Art students experimented with a variety of surfaces and display options for their paintings. While some students worked on canvas and wood for their ACRYLIC LANDSCAPES, others opted to create a 2-way painting called an Agamograph.

agamograph_02

The examples pictured here show 3 views of the same project:
– The center view shows two separate images converging.
– From the angled views on either side, the viewer sees only one image.
The complete composition comes to life only as the viewer physically moves from one side to the other.

agamograph_04

To accomplish this magical illusion, students first created two acrylic paintings on paper. The first painting was a stylized landscape using analogous colors, while the second included a close-up detail from the first landscape in a different analogous color scheme.

agamograph_05

Once the paintings were complete, students measured, numbered, and carefully cut both paintings into 2″ strips. The strips were then glued to an accordion folded board. While our final Agamographs became two-way paintings, instructions for a 3-way version can be found on the Art-Rageous website.

agamograph_06

Agamographs are named after Israeli artist, Yaacov Agam, who was a pioneer creator of the kinetic art movement. Students were intrigued by his large-scale sculptural work and abstract style. By following in Agam’s footsteps, students learned a new way to actively involve the viewer in their artwork.

agamograph_03

For anyone who might want to replicate this project, it can be accomplished with a variety of 2-dimensional media, including photography, ink drawings, colored pencil, or oil pastel to name a few. I recommend selecting a subject for each image that relates in some way or creates a duality. Visual contrast between the two images also enhances the transformative effect. Feedback is always welcome! Comment with any questions and let me know what you think!

Getting Crafty at Camp

campsloggett_01

I was so thrilled when the 8th grade team invited me to lead a craft activity at the 8th grader’s annual Camp Sloggett excursion. Mr. Sanderl and I packed up our tent and prepared for 2 days of Koke’e camping with 120 middle schoolers! Check out Mr. Sanderl’s 2014 KMS KOKEE TRIP video on Vimeo for highlights.

campsloggett_02

The craft I chose is one that I remember from my own summer camp days at Miracle Ranch in Gig Harbor, Washington. In fact, that was probably the last time I made knotted friendship bracelets! Breathing the fresh mountain air, sharing a fun craft from my childhood, and bonding with the kids made camping one of this year’s highlights.

Exotic Animals

copper_01

Copper Tooling has become a favorite medium that I bring back every year due to popular demand. Although the same techniques are employed, I always change the project theme to keep things interesting. In past years we explored abstract designs with colorful borders, and Hawaii’s endangered species. This year’s theme involved exotic animals from lands far away.

copper_02

This art teacher believes in research and planning before launching in to any major project, and copper repousse is no different. We spent two full lab days exploring various animals, sketching ideas, and taking notes on common names, species, habitat, and interesting facts.

copper_04

Once a basic contour of the exotic animal face was established, students filled it in with designs and textures. For ideas I had them enter “zentangle animals” into their search browser. Stylizing the frontal image and adding additional texture to the face resulted in a much more complex and interesting design.

copper_05

A final drawing on paper followed the sketchbook planning activities. This drawing was transferred directly onto the copper foil, leaving a slightly indented image. The longest and most labor-intensive part of this project involved tooling and chasing techniques to create a 3-dimensional relief using wooden tools to rub and stretch the copper.

copper_03

Final steps included antiquing the copper with liver of sulfur, polishing with steel wool, and protecting with a high gloss acrylic varnish. For display, students used colored pencils on black railroad board to finish the composition with a creative border.

Acrylic Landscape

landscape_01

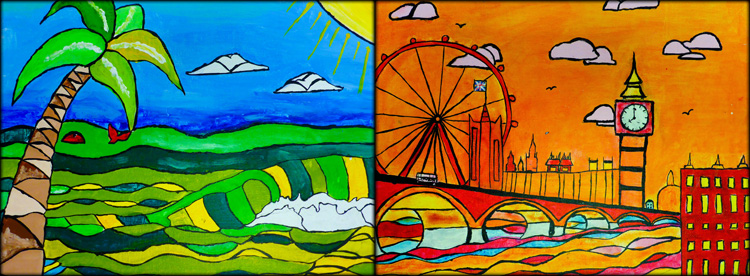
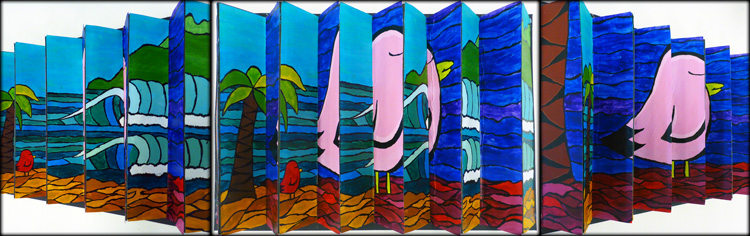
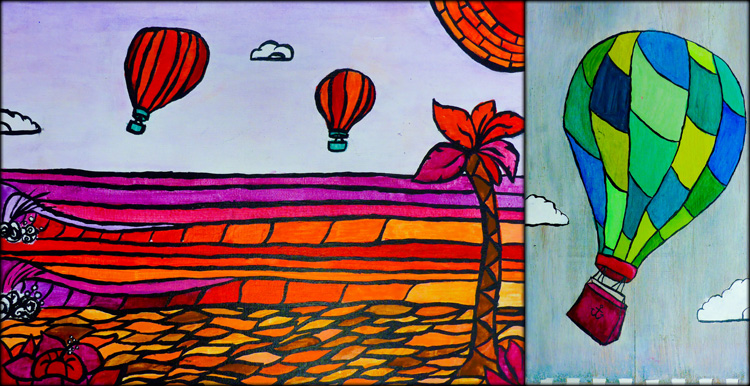
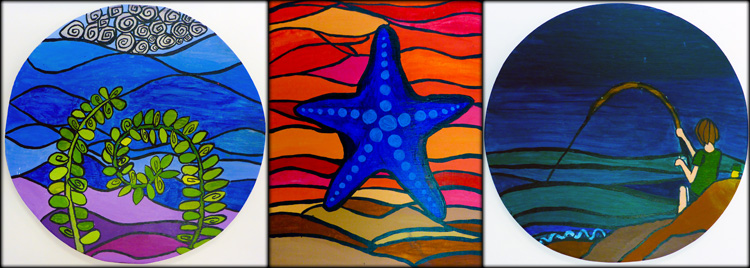
KMS Art students each created two acrylic paintings this Spring. The first painting was a landscape of their choice, while the second included a close-up view of one small detail selected from their original landscape. Each painting was designed with a different analogous color scheme that needn’t resemble real-life.

landscape_02

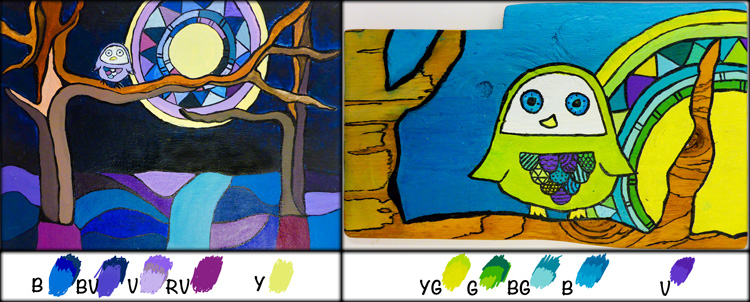
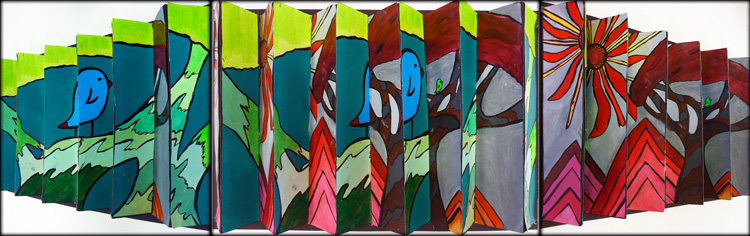
The paintings above and below demonstrate the analogous color study, which involved selecting a group of 4 colors adjacent to each other on the color wheel. Aside from one small highlight color outside of the analogous scheme, students were limited to this small range of hues to which they could tint, tone, and shade (creating value scales from dark to light by adding black, white, and gray).

landscape_09
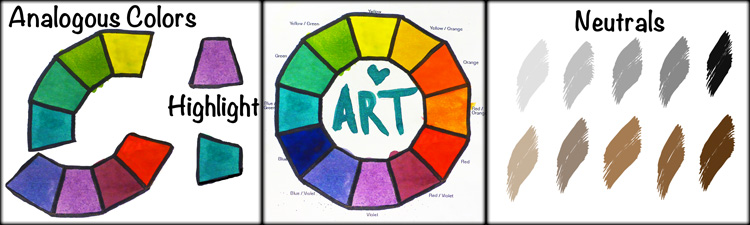
Additionally, neutrals such as black, white, gray, and brown were used to accent the more vivid hues. The color scheme for this project required students to become very familiar with their color wheels, encouraged A LOT of paint mixing, and invited a unique perspective of the landscape.

landscape_03

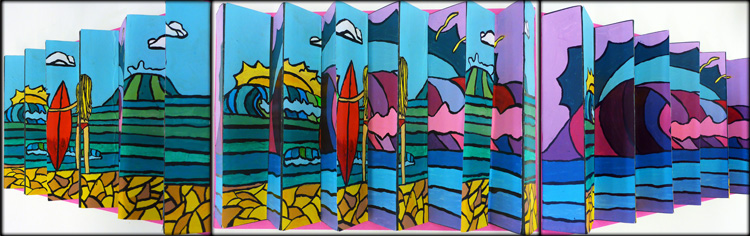
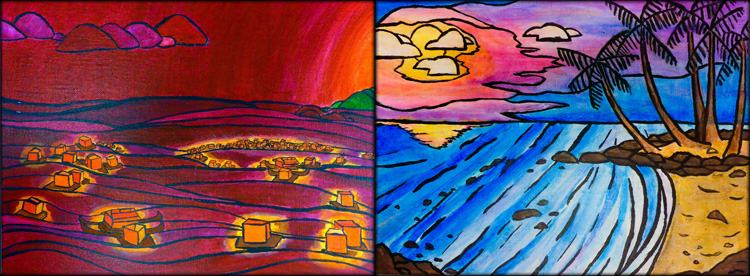
Students were introduced to the work of artist, Heather Brown, who’s signature style includes simplified shapes, bold black outlines, and Hawaii’s local surf spots. Like Heather Brown, students simplified and stylized their landscape on 9 X 12″ canvas board.

landscape_04

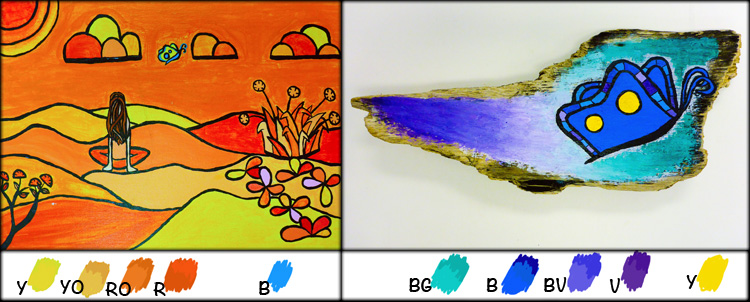
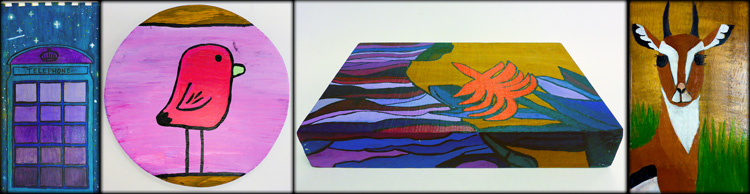
Students were also inspired by Spencer Reynolds, who often paints seascapes on surfboards and driftwood. For the detail painting, students used acrylic paint on a scrap of wood. Some chose to leave part of the woodgrain exposed and unpainted to incorporate the texture and linear wood patterns within their design.

landscape_05

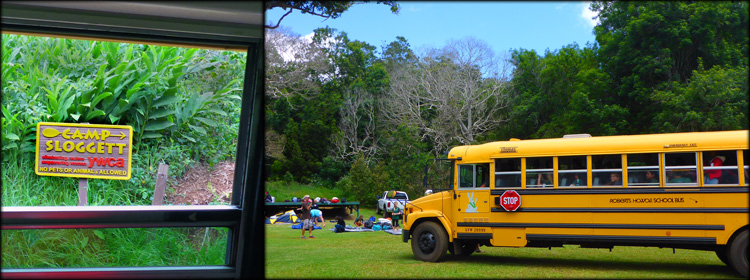
The landscapes students chose to paint ranged from their favorite spots on Kauai to far-off destinations that they hope to visit one day. Before settling on a design, students spent time researching various landscapes including urban environments, forests, mountains and beaches.

landscape_08

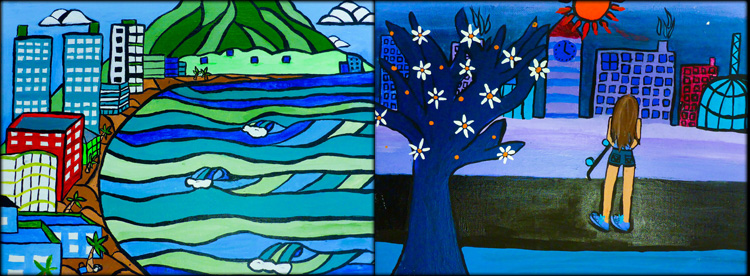
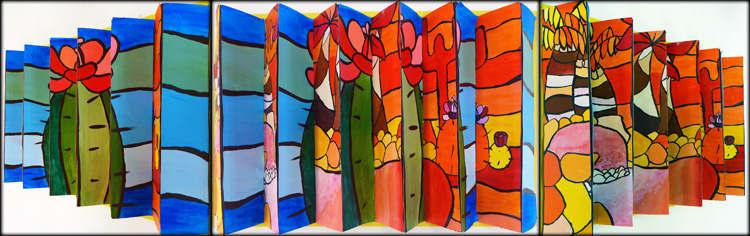
Analogous color schemes generally create serene and comfortable designs, are often found in nature, and are harmonious and pleasing to the eye. Students began with one dominant color, selecting 3 others on either side of the color wheel to support.

landscape_07

Painting guidelines for the landscape included:
1. Stylize, flatten and simplify shapes
2. Add extra details to the edges and corners for framing and interest
3. Use layering and scale to create a sense of depth
4. Include black outlines to separate many areas of color value

landscape_06

Ceramic Tiki Sculptures

Kapa’a Middle School’s Art students finished their tiki sculptures with either a pure white or natural brown glaze.  By limiting to one glaze color, the emphasis of this 3-dimensional work remains  the carved textures, modeled form, and sculptural details.

2

In addition to expressive tiki characteristics, some students chose to include added symbolism to represent a specific hawaiian tiki god or their own special meaning.

1

While mainly decorative, the tikis can also serve a variety of functions, from garden art, candle holders, incense burners, or creative containers to hold knick-knacks.  Melted colorful class at the base adds a colorful surprise when you look inside!

The sculptures pictured here are only a few samples to represent a range of students from 6th, 7th, and 8th graders selected from all of my classes.  In all there are 170 tikis that required a total of 500 lbs of clay, 5 gallons of liquid glaze, a number of kiln loads, and 4 months to complete!

3

Inspired by Masters

analysis_08

While making and creating original Artwork is the main focus of my instruction, students also gain important skills through the study of Art History, criticism, and analysis. I’m careful to embed these connections and critical thinking elements within every project, but for this particular assignment they were the main focus.

analysis_11

Students worked in groups to complete a graphic organizer (above) that helped them navigate through the steps of Feldman’s Model of Art Criticism. Students’ understanding was evaluated on the level to which they completed the graphic organizer in their sketchbooks, and their ability to explain it to the class during a final group presentation.

analysis_07

I designed this project to accomplish one Student Learning Objective (SLO), a component of the new Educator Effectiveness System (EES) required by Hawaii’s Department of Education this year. Multifaceted and demanding components of the EES system were rolled out during this “practice” year. Unfortunately, this new expectation lacked the necessary structure, models and training to support success. As a result, many teachers were overwhelmed, frustrated, and discouraged. I am attaching all of my planning documents, rubrics and results (excluding any confidential information), in the hopes that it will help other teachers accomplish their goals (see the links at the end of this post).

analysis_09

A Student Learning Objective (SLO) is a broad overarching goal that embodies the core of instruction. Student achievement is measured by individual growth toward understanding and mastering the SLO. Hawaii teachers were required to design and implement two SLOs this year. My first SLO may appear simple, but requires a solid understanding of the fundamental principles of Art: “Students will apply an understanding of the Elements and Principles of Design when interpreting, evaluating, and/or creating Art.” Click the links below for documents.

SLO
RUBRIC
BASELINE DATA & ASSESSMENT CHART
CORE PROFESSIONALISM

analysis_10

Trash to Treasure

“Collaborating for a Cause” was at the heart of this project that involved collecting plastic and waste from local beaches and making a statement about the environment.  After several beach clean-ups and discussions about our message, students got creative inventing ways to make socio-political recycled works of Art.

FLUX CAPACITY

The title of this artwork references the power and source of the famous “Delorean” from the movie Back to the Future. This iconic car travels through time completely powered by feeding trash into its flux capacitor. Flux is the action of flowing in or flowing out, and capacity is the maximum amount that something can contain.

The artwork titled “Flux Capacity” displays an incredibly powerful, beautiful, and dynamic force of nature that is infected with non-biodegradable plastics that are currently plaguing our oceans, beaches, and marine life. This is a call to all surfers, swimmers, and beach-lovers to join in an effort to clean our waves and water!

ONE EARTH, ONE CHANCE

This artwork seduces you with its beautiful colors and painterly design.  Once it draws you in closer, it may come as a surprise that parts of it are made from colorful plastics collected from our local beaches.

Sometimes it takes a different viewpoint or creative eye to find something that we normally think of as ugly trash, and turn it into beautiful artwork.  As you allow this work to sink in, you may begin to uncover the layers of meaning that are captured here.

OUR BEACH

As you read the message in this artwork, who do you see?  Plastics and trash were adhered onto a mirror surface so as you read the words “Our Beach,” you also see yourself.  The reflection might evoke feelings of personal responsibility because we all play a part in overconsumption.  We can also all be part of the solution!

When students came up with the message they wanted to communicate through this artwork, they initially said “Your Beach.  My Beach. Our Beach…  Make a Difference.”  The final artwork was streamlined to impact viewers with a simple and meaningful idea that connects us all.

PLASTIC EARTH

05

This group of artists formed their composition on a large plastic buoy that was found littering one of our local beaches.  The mosaic of colorful found-plastics looks beautiful, yet also implicates the threat our Earth faces.

Look closer and you may also notice some familiar island forms whose symbolic colors stand out against the blue-green seas.  The same threats that face us globally, also ensure imminent local impact.  Let’s make a positive difference!

Tiki Sculpture Progress


During second quarter Kapa’a Middle School Art students created a ceramic sculpture with a Hawaiian tiki theme. Along with clay hand-building techniques such as coil and slab building, students also explored the history and symbolism of tikis. These modern tikis represent students’ unique interpretation of an ancient cultural practice. While some students chose to include symbolism representing one of the four ancient tiki gods Lono, Kanaloa, Ku or Kane, others chose to invent their own tiki god.

This week I’m loading up the kilns to prepare for bisque firing. When students return from Winter Break they will finish by glazing their sculptures. Stay tuned for the final Artworks!

Silly Skeletons


Look closely at these skeleton bones and you’ll notice they spell a name! This crafty project has my Advisory students busy making a seasonal decoration for the classroom. The best part is they used odds-and-ends left over from my Art classes including cardboard boxes, scraps of white drawing paper, buttons, lace, ribbons and shreds of fabric.

This lesson is a great opportunity to teach students how to write in cursive (many kids don’t even know how to write their own name!). Check out Beautiful Bones for another artsy skeleton project!